A while back Robert Douglass had written a great guide to setting up Acquia Dev Desktop to use Xdebug on Mac OS X. Looking for it today it looks like the sands of time have erased it from the webs. At the same time the recent versions of Dev Desktop include Xdebug so the process is a little different (and simpler).
In this case I'm setting up Xdebug to work with Komodo IDE and Dev Desktop that comes bundled with Drupal 7. After installing Dev Desktop and setting up your first site it's time to enable Xdebug. In the recent versions of Dev Desktop it ships with Xdebug but the PHP extension is turned off.
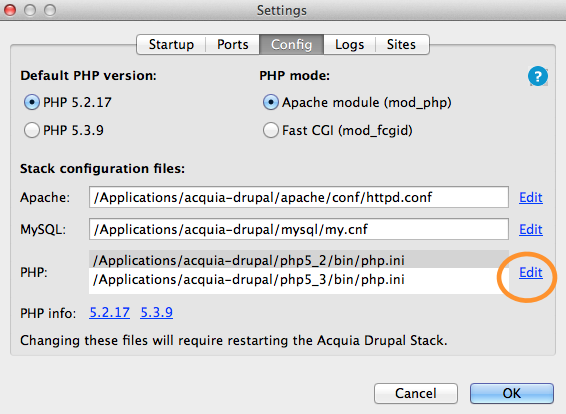
The first step is launching the Dev Desktop control panel. Once it has started click the "Settings..." button in the lower right. Then pick the "Config" tab at the top center to see the server configuration. The screen shot here shows PHP 5.2 but the process is the same for 5.2 or 5.3. Whichever version of PHP click the Edit link beside the php configuration files.
This will open the chosen php.ini file in Text Edit. With the file open look for the line containing xdebug.so. If the installation is in the standard directory it will look something like this:
;zend_extension="/Applications/acquia-drupal/php5_2/ext/xdebug.so"The only thing to do here is to remove the semi-colon at the beginning of the line. Note that users of OS X Lion may see a message here about the file being locked. If this dialog comes up choose "Unlock" rather than duplicate.
In addition to removing the semi-colon in the line above several lines need to be added to the php.ini file. Add these lines below the zend_extension line with xdebug.so on it. The very end of the php.ini is a fine place to add them.
[debug]
xdebug.remote_autostart=off
xdebug.remote_enable=1
xdebug.remote_handler=dbgp
xdebug.remote_mode=req
xdebug.remote_host=localhost
xdebug.remote_port=9000
With these edits in place save the file and return to the Dev Desktop control panel. Close the settings pane and then stop and start Dev Desktop's services.
The last bit of configuration takes place in Komodo. Open Komodo and go to the Preferences.
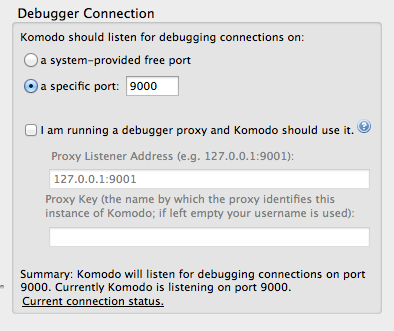
Check the radio button for a specific port and make sure it's set to the default 9000. Once that is set choose Languages > PHP in the preferences. In the top of the PHP preferences within Komodo is an option to set the PHP Interpreter. By telling Komodo to use Dev Desktop's PHP installation everything should happen as expected.
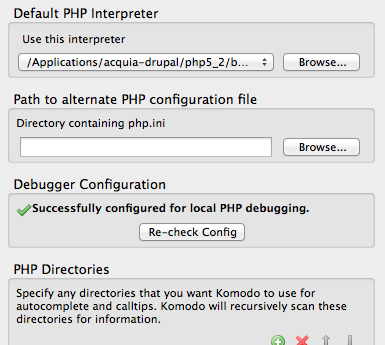
Click the Browse button and navigate to the Acquia Dev Desktop install directory then to the version of PHP in use on the site. Finally look for the bin directory and then the php executable.